
Tag Archives: windows
OpenWatcom: Fixing a Compiler Bug
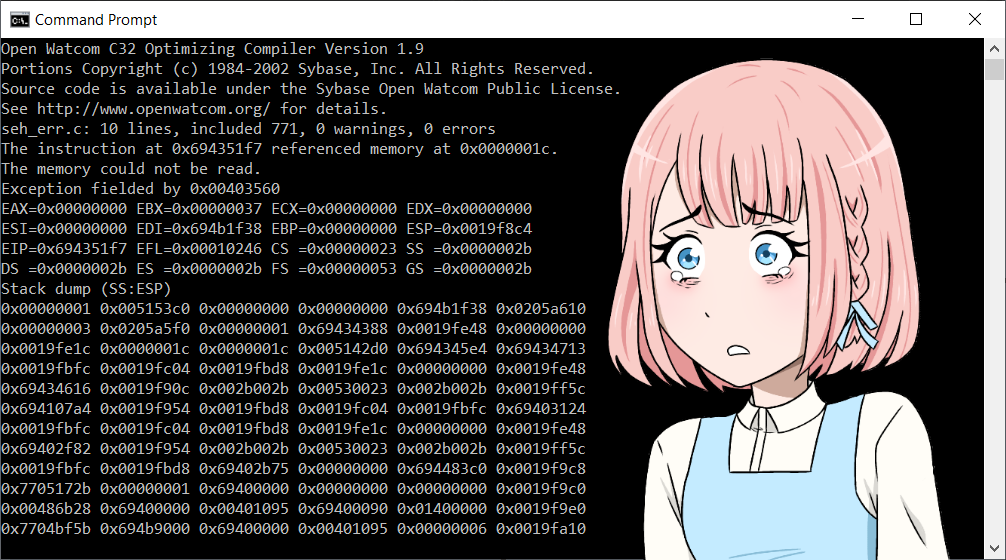
Here I go through the story of finding a bug in a compiler, building, and fixing it. It’s a story of dealing with an unfamiliar build system and unfamiliar code base. Not all the details of the false starts and mistakes follow, but enough of them to show how one can use basic tools to figure out how an unfamiliar system works.
Why OpenWatcom? I first came across OpenWatcom when I started being interested in programming for OS/2. This was in 2006 or so. At the time, and still I believe, OpenWatcom was the only current compiler that made native OS/2 binaries. GCC compiled code requires a Posix runtime environment, either the old EMX, or the newer klibc1.
I’ve also used OpenWatcom for DOS development. I am interested in retro programming, and at the time (in the 90s) I just wasn’t good enough to do what I wanted to do; so I’ve let my teenage dreams come true in recent years. Mostly I run my DOS applications in DOSBox, and I run my compiler in the same system I use to run DOSBox, such as ArcaOS and Windows. OpenWatcom is famous for being the compiler of choice for most of the big name DOS games such as Doom and Tomb Raider; see the list of software made with the Watcom compilers.
Even though OpenWatcom only makes 32bit binaries, I’ve also used this occasionally for Windows programming. I don’t remember where and when, but I came across Structured Exception Handling in the context of Windows programming, and one day I wanted to give it a try; this time I chose OpenWatcom rather than Visual Studio.
Continue reading OpenWatcom: Fixing a Compiler Bug
Building and Deploying 64bit FastCGI Applications in C on Windows 10
Here we go through the steps needed to build and run 64bit FastCGI applications with Visual Studio 2019.
Building the FastCGI SDK
First, get the FastCGI SDK from the Github archive. Second, open an x64 Native Tools Command Prompt for VS 2019.
Then extract the archive. 7z can do this in two steps. Here we build in C:\build but any convenient place works.
cd c:\build
7z x %homepath%\Downloads\fcgi-2.4.1-SNAP-0910052249.tar.gz
7z x fcgi-2.4.1-SNAP-0910052249.tar
We can delete the temporay .tar file now.
del fcgi-2.4.1-SNAP-0910052249.tar
Now we can try to build with the provided NT Makefile.
cd fcgi-2.4.1-SNAP-0910052249
nmake -f Makefile.nt
And we get a fatal error.
fatal error LNK1112: module machine type 'x64' conflicts with target machine type 'x86'
To figure out what’s wrong, we first take a look at the Makefile.
all: "include\fcgi_config.h"
	cd ".\libfcgi"
	$(MAKE) $(MAKEFLAGS) /NOLOGO /F libfcgi.mak     CFG=$(CFG) $@

	cd ".\..\cgi-fcgi"
	$(MAKE) $(MAKEFLAGS) /NOLOGO /F cgi-fcgi.mak    CFG=$(CFG) $@

	cd ".\..\examples"
	$(MAKE) $(MAKEFLAGS) /NOLOGO /F authorizer.mak  CFG=$(CFG) $@
	$(MAKE) $(MAKEFLAGS) /NOLOGO /F echo.mak        CFG=$(CFG) $@
	$(MAKE) $(MAKEFLAGS) /NOLOGO /F echox.mak       CFG=$(CFG) $@
	$(MAKE) $(MAKEFLAGS) /NOLOGO /F size.mak        CFG=$(CFG) $@
	$(MAKE) $(MAKEFLAGS) /NOLOGO /F echo-cpp.mak    CFG=$(CFG) $@
We see that the Makefile is calling other Makefiles, so we take a look at the first one, libfcgi.mak, and there we find this line:
LINK32_FLAGS=Ws2_32.lib /nologo /dll /pdb:none /machine:I386 /out:"$(OUTDIR)\libfcgi.dll" /implib:"$(OUTDIR)\libfcgi.lib"
where we try to remove the /machine:I386 and rebuild.
nmake -f Makefile.nt
We get a little further this time, and fail again when building cgi-fcgi.mak. In that file we have
LINK32_FLAGS=libfcgi.lib /nologo /pdb:none /machine:IX86 /out:"$(OUTDIR)\cgi-fcgi.exe" /libpath:"..\libfcgi\Release"
where we again remove the /machine:IX86 and try again.
We repeat this process for authorizer.mak, echo.mak, echox.mak, size.mak, and echo-cpp.mak.
Now we have a successfully built FastCGI SDK, and can try to deploy the examples.
Deploying the FastGCI Examples on Apache 2.4
Installing the FastCGI Module
Here we assume that the Apache binaries have been downloaded from the Apache Lounge. It is outside the scope of this tutorial to include how to configure Apache to start and stop with Windows. We’ll only mention that the server can be run in a console with httpd in the bin subdirectory.
For our purposes, we’ll assume Apache has been installed in C:\opt
First, extract the module in a convenient location,
7z x %homepath%\downloads\mod_fcgid-2.3.10-win64-vs16.zip
and copy the module into Apache’s root,
copy mod_fcgid-2.3.10\mod_fcgid.so C:\opt\Apache24\modules\
and then edit C:\opt\Apache24\conf\httpd.conf and add
LoadModule fcgid_module modules/mod_fcgid.so
and finally restart Apache. If you’re running it in a console, you can ctrl+c, wait for a few seconds while it shuts down, and then restart with httpd
Deploying the Examples
First, we prepare the document root for FastCGI applications. On Windows, it’s customary to put DLL files directly where the executable is, or in the system’s PATH. For our purposes, putting the libfcgi.dll file in our path seems like an overkill, so we will put it in our document root along with the executables, but we don’t want people to be able to load the DLL files. Therefore we change the document root default access to a denial.
Given
DocumentRoot "${SRVROOT}/htdocs"
<Directory "${SRVROOT}/htdocs">
    Options Indexes FollowSymLinks
    AllowOverride None
    Require all granted
</Directory>
we change the Require line to read
Require all denied
and then add
    <Files "*.exe">
        Options +ExecCGI
        SetHandler fcgid-script
        Require all granted
    </Files>
So our complete document root directory config is now
DocumentRoot "${SRVROOT}/htdocs"
<Directory "${SRVROOT}/htdocs">
    Options Indexes FollowSymLinks
    AllowOverride None
    Require all denied

    <Files "*.exe">
        Options +ExecCGI
        SetHandler fcgid-script
        Require all granted
    </Files>
</Directory>
At this time we are ready to copy the executables we built earlier into our document root. In the x64 native tools command prompt we used earlier to build the SDK, copy the files into the document root we just prepared.
copy examples\echo\Release\echo.exe c:\opt\Apache24\htdocs
copy examples\echo-x\Release\echo-x.exe c:\opt\Apache24\htdocs
copy examples\echo-cpp\Release\echo-cpp.exe c:\opt\Apache24\htdocs
copy examples\size\Release\size.exe c:\opt\Apache24\htdocs
copy libfcgi\Release\libfcgi.dll c:\opt\Apache24\htdocs
And now we can try the various samples in our browser with echo.exe, echo-x.exe, echo-cpp.exe, size.exe, and finally, we make sure that downloading the DLL doesn’t work with libfcgi.dll.
If there are any failures, check the Apache error log.
Building Our Own FastCGI Application in C
We can now demonstrate how to build and deploy our very own FastCGI application, written in C.
The code is simple.
#include <fcgiapp.h>

int main( int argc, char *argv[] ) {
  FCGX_Stream *in, *out, *err;
  FCGX_ParamArray envp;

  while ( FCGX_Accept( &in, &out, &err, &envp ) >= 0 ) {
    FCGX_FPrintF( out,
                  "Content-type: text/plain\r\n"
                  "\r\n"
                  "Hello, world.\r\n" );
  }
}
This hello world example loops continuously and accepts FastCGI connections, and then just displays a plan text Hello, world message. It is just a bare bones example.
And the Makefile is also very simple. You will have to adjust the compiler path to your own installation, and the -I and -L flags. The -m64 means we’ll build a 64bit executable, the -g means we’ll include debug symbols, and the -Wall -Wextra flags tells the compiler to issue warnings when we do something dangerous or unexpected. The link flag -llibfcgi tells us to link against the DLL we just built and installed.
CC="C:\Program Files (x86)\Microsoft Visual Studio\2019\Community\VC\Tools\Llvm\8.0.0\bin\clang.exe"

CFLAGS=-m64 -g -Wall -Wextra -IC:\build\fcgi-2.4.1-SNAP-0910052249\include
LDFLAGS=-LC:\build\fcgi-2.4.1-SNAP-0910052249\libfcgi\Release -llibfcgi

hello.exe: hello.c
	$(CC) $(CFLAGS) hello.c -ohello.exe $(LDFLAGS)

install: hello.exe
	copy hello.exe C:\opt\Apache24\htdocs
Here, the installation target doesn’t copy the DLL file, we assume that’s been taken care of beforehand.
Happy coding FastCGI applications.
Contact
The author can be reached at johann@myrkraverk.com.
Building Mozilla NSS on Windows 10
If you’re like me you may have searched the web on how to build the Mozilla Network Security Services on Windows 10. You may have found this obsolete project on Github. You may also have found the obsolete directions for Pidgin too.
On Windows the NSS build requriements are the same as for Firefox, so go look through the build instructions for Firefox on Windows. Install Visual Studio 2019 as directed, or add the packages you need with the Visual Studio Installer. And install the Mozilla Build package in the default directory.
Now that’s done, we have one more requirement left, and that’s Gyp. For Gyp, we first need Git. If you don’t have it already, install it now. At this point I’m not certain Git comes with Visual Studio 2019. It could be, but I have a separate install anyway.
All the instructions now assume you have opened an x64 Native Tools Command Prompt for VS 2019, so open one if you don’t have already.
I prefer to keep my software I build in C:\build, so that’s what the directions will indicate.
cd c:\build
git clone https://chromium.googlesource.com/external/gyp
Gyp is a Python program, so if you don’t have it already, add Python to your path. You’ll find it in C:\mozilla-build\python and also add gyp to your path, like so
set path=%path%;C:\mozilla-build\python;C:\build\gyp
Download and extract nss-3.45-with-nspr-4.21.tar.gz By the time you read this, that particular download might be obsolete, so please adjust as needed.
I use 7z for my command line examples.
cd c:\build
7z x %homepath%\Downloads\nss-3.45-with-nspr-4.21.tar.gz
That only creates the tar file, so we need to run 7z again.
7z x nss-3.45-with-nspr-4.21.tar
You may need to add vswhere to your path, and you can do that now with
set path=%path%;%ProgramFiles(x86)%\Microsoft Visual Studio\Installer
At this point we’ll need an msys shell. So still in your x64 Native Tools Command Prompt for VS 2019,
cd C:\mozilla-build\msys
msys
In msys, cd to the place where you extracted NSS.
cd /c/build/nss-3.45/nss
And build with
./build.sh
And you should get a nicely compiled debug build in C:\build\nss-3.45\dist. Happy hacking with NSS.
Contact
The author can be reached at johann@myrkraverk.com.